Problem:
You’ve bought yourself a nice home-automation solution like MicasaVerde or WeMo, but supplying power to your TV only powers it up and puts it in suspend mode.
Solution:
Some TV’s are smart enough to remember that if they were powered down in active mode, when the power returns, boot straight to active mode again. So let’s build a device that replicates this functionality with A small micro-controller hooked up to a 5-volt power source and an IR LED with firmware that flashes the IR code to turn on the TV as soon as it receives power. This way, if you hook the power source for the micro-controller into the same, switched outlet that the TV is plugged into, when the TV receives power, it will subsequently, automatically be turned on.
The Hardware
First, we need to pick a micro-controller. A common and often used one is the Arduino board. But that’s a lot more power than we need for this project, so let’s go smaller. An ATtiny85 has all of the functionality we need but costs a whole lot less and with it’s few pins and internal clock, will be a lot simpler to wire up! Here’s a bill of materials for this project:
- ATTiny85 https://www.sparkfun.com/products/9378
- 5 volt power supply
- Small prototyping perf board
- IR LED https://www.sparkfun.com/products/9349
- 150 Ohms Resistor
- Right angle pins (2)
- ATTiny85 programmer ( I built a simple one with an Arduino pro mini. https://www.sparkfun.com/products/11113 )
The Firmware
The Arduino sketch for this project is deceptively simple. Ken Shirriff’s Multi-Protocol Infrared Remote Library for the Arduino is what does all the magic! The tough part will be getting the codes to your own TV. I used my own IR Shield to get the codes that I needed, but for this purpose, all you really need is a spare Arduino and and IR Receiver. Ken has parts and schematic information on his site.
|
1 2 3 4 5 6 7 8 9 10 11 12 13 14 15 16 17 18 19 |
#include IRsend irsend; #define Power 0x2FD48B7 #define Exit 0x2FD1AE5 #define VolUp 0x2FD58A7 #define Mute 0x2FD08F7 void setup() { OSCCAL = 0x88; delay(7000); irsend.sendNEC(Power, 32); } void loop() { } |
Putting it all Together
First, you’ll need to pick your programmer for the ATTiny85. This programmer from sparkfun will get the job done. Alternatively, you can build your own if you’ve got a spare Arduino sitting around (Who doesn’t?!). This tutorial from High-Low Tech will walk you through setting that up. I ended up building a board using an Arduino Mini from Sparkfun. I really like this method because the board was really simple to put together (I’m using the schematic from High-Low Tech), cheap and my Arduino mini is not permanently committed to Attiny programming duty. Though, I may make another version with a Zif socket; it can be a bit of a pain inserting and removing the ATTiny.
Next, if you’re using the internal timer in the ATTiny85 you’ll need to calibrate it for it to be precise enough for replaying IR codes. The TinyTuner Arduino Library will accomplish this for you, have a look at Nathan Chantrell’s blog entry under the heading ‘Calibrating the oscillator’ for a nice explanation of the process.
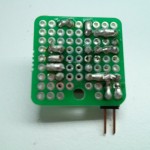
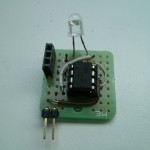
Putting the board together is a snap, there’s no difficult soldering here, it’s all well spaced through-hole soldering. Take a look at my schematic and some images of what the board looked like completed.

Is there a name for this type of soldering? It’s not pretty but it was easy, it’s solid and it works.
Final Setup
Lastly, it’s important to set the LED properly in view of your TV’s IR receiver. I used a little bit of velcro tape to attach the board to the TV. This worked well except that my device can only control the TV. I’d like to have it also turn on my sound bar while it’s at it. A revised version of the board could include two connectors for LEDs instead of one permanently connected LED. That way, I could put IR LEDs on the end of some wires and place them next to the receiver of each appliance. That would also allow me to hide the little circuit board.
π


